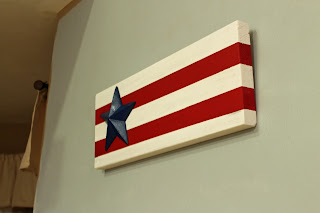
We are working to add a little life and personality to our home, on a very tight budget I might add. Wall art/home décor can be very pricey, so I have set out to find things we like and make them el cheapo for our place. When we moved in hubby was brown-happy, including our wall art. So I set out to find inspiration, or Pinspiration, for ideas. Where else does one go when searching for ideas, Pinterest! I found this awesome red and white stripes with a blue star.

I tried to find the source and original pin but it said it was reported as spam!? I don’t know weird error message, so if for some reason the original source of this picture happens to stumble (because it would have to be a stumble) upon my blog, I am not trying to take credit of your picture/idea and I tried to find you. I apologize! 
So I immediately fell in love, took a picture, sent to the hubby for approval, received the ok text message back- score!
We headed to Lowes, to purchase wood for another project and paint for another project, and on our way home swung through Hubby Lobby (like that play on words, he says my trips there always require work from him…and they do!) and we picked up a metal star and blue spray paint. I planned on using other stuff we had around the house to complete this look. I knew exactly where this was going to go, however I failed at a before picture. Sorry!
First thing I did was take leftover wood and beg hubby to cut it into a square. Before he started cutting, I said WAIT and he about cut his finger off, not really but he jumped. I had a thought, we took the board inside and held it up in the place I wanted to hang it. We both decided it would be best oblong. So we left the piece of wood as is, score less work for hubby!
So the supplies I needed where:
a piece of wood
red and white acrylic paint
blue spray paint
painters tape
sponge brush
metal star
I began by taping off lines on my board. I didn’t get too fancy I knew I wanted less red stripes and wanted them chunky looking so I used the width of my painters tape to estimate how far apart I wanted the stripes.
Once I got the tape down I was ready to start painting. Like I said I didn’t want but two red stripes so that is the color I started with. Selecting the “right” red was the hardest part of this project. I knew that I wanted it to look rustic so “true red” would have been too red, but if I went with a “rust” it would look to orange, so I ended up with “Tuscan red”. I’m SO happy with my choice.
I used the sponge brush to paint it on with so I didn’t have brush marks. I wanted the grain of the wood to show through slightly for the rustic feel but not too much. I ended up having to do about three coats of red.
After I let the red dry completely, I peeled off the tape to see the damage. There is one thing I HATE and I do mean HATE and that is taking the time to use painters tape, paint gently, wait for it to dry, and peel it off only to show bleeding. It just burns my hiney! I have about three different brands of “painters” tape and all of them do this. So if you have a tape that works for you, puh-lease leave me a comment with your suggestions!
To my surprise, this tape did a pretty good job. Not too much bleeding and none that could be seen once I added the white.
I forgot to mention above, but I even painted the side of the board for a finished look.
I took the painters tape and placed it over the red lines, I was going to try to free hand the white, but I knew I was not that good at painting so I opted out of doing it that way. Once I got the tape to cover up the red lines completely, even on the sides of the boards, then I started painting the whites.
For the most part this worked great, there were no white runs into the red. What I did have to do was touch up some white because, for some odd reason, there was raw wood between the red and white lines. I just dabbed some white on that raw wood and we were good to go!
I failed to get pictures of the last two steps. No worries, they were super easy and I’m pretty good at explaining:
White I was waiting for the white to dry, I spray painted my rusted looking metal star blue.
While that was drying, hubby nailed a finishing nail into the board.
After all was dry, I removed the last painters tape, hung the star and ta-da…
There she hangs in her beauty! I absolutely am in love with it. Hubby even told me this was his favorite of all my projects to date! Cha-ching!! I love that it represent my country but is rustic at the same time. It’s perfect and was a perfect fit for this space as we work to revamp our living room décor.
Speaking of revamping, this last picture gives you a sneak peak at our painting project…yes I have LOST my mind and am already repainting our living room! I can’t help it, I was browned out.
P.S.
I apologize for the quality of these pictures, my iphone is packed and I need to download the pictures to free up space and my big cam was dead…so these are pictures taken from hubby’s phone.


No comments:
Post a Comment