Monday, June 18, 2012

Father’s Day 2012- Q-town

This year Father’s Day was slightly different, because hubby had to work, so we decided to split up the celebrations on two different days.  It was so nice to be able to celebrate all day at both parents homes on two separate days.  It is an hour between my parent’s home and hubby’s parents home, so when we go to either it is typically an all day affair.  On Saturday we were in Q-town celebrating.  Because we had two days of celebrating, I have a lot of pictures to share- did you expect any less?


IMG_4457

IMG_4472

First thing we did was get on the “tractor” as little man says, and ride. A few weeks back we had a really bad storm come through the area and a tornado spun off it on the farm. Thankfully not a whole lot was damaged in the storm, but there was a HUGE tree that was uprooted.  I have heard about what tornados can do but to actually see it in person was pretty amazing.

IMG_4476 copy

Headed to check out the tree.

IMG_4478 copy

IMG_4480 copy

I’m telling you this thing was massive.  The root-bed had to be at least 30 foot tall.

IMG_4488 copy

Scale picture for you, they are around 5’7’-5’9’…nothing compared to the roots on this bad boy.

IMG_4489 copy

We had to get a family picture in front of tree.

IMG_4495 copy

IMG_4499 copy

She was amazed at all the dirt.

IMG_4503 copy

And it quickly became yummy in her tummy.

IMG_4518 copy

After we explored the tree for a little bit, we rode over to check out the garden.  Daddy is explaining to little man that the peas he likes to eat are growing right there. 

IMG_4523 copy

This is what you do on a Friday night on the farm!  Fun times Smile

IMG_4530 copy

Then we played in the corn for a little bit, it was a bit too much “children of the corn” for me. 

IMG_4536

IMG_4540

IMG_4542

IMG_4543

Playing in the fields are always fun and it makes for a really pretty sunset.

IMG_4545 copy

IMG_4553

Baby girl was enjoying the sunset so much she pulled up a seat for a good view.

IMG_4559 copy

Little man got to pick his first peas, he thought it was the coolest thing.  We told him in a few years he will not think it was that cool.

IMG_4573 copy

IMG_4576 copy

On Saturday, we hung around the house.  Played in the pool and enjoyed great company.

IMG_4580

IMG_4581 copy

IMG_4591 copy

Pool time with my Auntie!

IMG_4592 copy

IMG_4595 copy

IMG_4598 copy

IMG_4605 copy

IMG_4608 copy

IMG_4609 copy

We even had some boiled peanuts…nothing like boiled peanuts on a hot summer day!

IMG_4615

IMG_4619 copy

Before we headed home, Daddy got a chance to swing the babies and just soak them up!

That is a proud look on this daddy’s face!  Makes me smile so big Smile

IMG_4620

IMG_4624 copy


Stayed tuned, on Sunday we headed to the other farm at my parents!

Monday, June 4, 2012

Console Table/Bookcase

As you know, we are working through the living room trying to bring color and life to it.  In doing so, I have been looking for ideas everywhere.  I have mentioned her before and I will mention her again, and probably many more times, but Jenna Sue is my style.  Although she is more beachy, and I want to be more rustic, for the most part everything she does I love and I tweak it to fit our home.  I saw her post  about a console table she made for her sunroom back in April and thought it was so simple but awesome.  I didn’t know where I was going to put it, so I stored it away in my “to be made” file and thought I would eventually get to it. 

Notice waaay back there in the corner of the living room behind hubby’s chair there are two metal art work hanging on the wall!??! Well right under that is a iron quilt rack.  We have had it since we got married but with babies now it had become a pain in my you-know-what.  They push it around the house, bang it into the walls and push it over on top of each other.  So my thinker bulb came on, I could put Jenna’s table there. 

Supplies I needed:

two 2x10 boards that were eight foot long

three inch decking screws

stain

acrylic paint

water

brushes

sandpaper

caulk

I picked up the two boards on my way home from work, convinced I could do this without hubby’s help.  After all, Jenna did!  Well, apparently she is more woman than me because I needed hubby’s help after all.

IMAG0070

First thing we did was lay out the boards to see where the warps were.  I brought the boards home, tied to the top of my car, in the rain.  So we knew there would be some damage, but they weren’t took bad.

We kind of “winged” it on this project.  I saw Jenna’s picture and wanted it, but I didn’t read her directions until after we were done.  You would have though I would have learned my lesson with the Florida String Art, but I didn’t.  This wasn’t too bad though.  We measured the space to see how big we wanted the table.  We settled for three foot tall and four foot long.  Went to the garage and began cutting the legs three foot tall.  Then we cut the top four foot in length.

IMAG0072

Hubby thought it would be easier to pre-drill the holes before we tried lining everything up.  I think it really helped.

IMAG0073

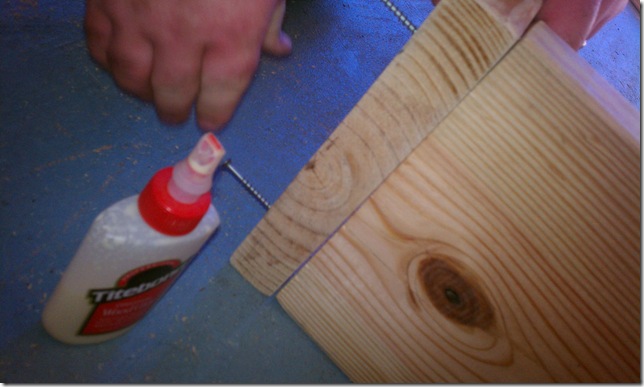
After we got the screws in the board about half way through, we added wood glue and lined it up.
IMAG0074

You want to use a “square” tool to make sure your boards are squared up correctly.

IMAG0075

Once we had the legs attached to the top, we measured the distance for the shelf.  We knew this would be about three inches shorter than the top because you have to subtract the width of the boards.  Although the boards are two inches thick, they are really more like a little over an inch and half thick.

IMAG0076

We measured and cut the shelf.

IMAG0081

Once we got the entire table laid out, squared away, and level, we screwed that bad boy together.  The babies even woke up from their nap just in time to stamp their approval on the masterpiece!

IMG_4319

After it was put together, it was time to caulk.  I made sure to caulk all of the seams that could be seen. 

IMG_4321

After the caulk was applied, it had to set two hours.  When buying caulk make sure you buy the All Purpose kind that says wood specifically or it will not work.  Also, I made sure I got the kind that said “paintable” but it STILL did not paint right. 

IMG_4341

After the caulk dried it was time to sand.  There were screw holes that were rough, not to mention the board was raw so there was a lot of knot wholes that were rough too.  I used a low grain (60) sandpaper and went over the entire table.

IMG_4343

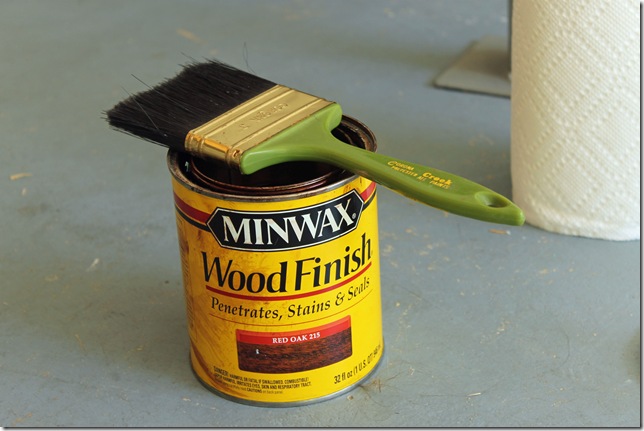
Then it was time to stain.  I already had two different color stains on hand.  I went with the darker one because I was anticipating whitewashing it and knew that I wanted the dark undertone before doing the whitewash.
IMG_4346

The stain was fairly easy to apply.  I didn’t want it to be saturated so I brushed a little and then wiped the excess off with a paper towel.

IMG_4347

Up close of the stain.

IMG_4348

While I was waiting for the stain to dry, I started making my whitewash.  I wasn’t sure exactly how I wanted it to look and I wasn’t really sure how to make the white wash.  I started off with a lot of water and a few drops of white acrylic paint. 


IMG_4350

I mixed the whitewash together and then decided I needed to add some black and make it more gray than white. 

IMG_4352

After adding some black, it looked a lot better.  Then I began whitewashing.  I thought about keeping it more watered down that way I add layers if I needed to make it darker.
IMG_4354

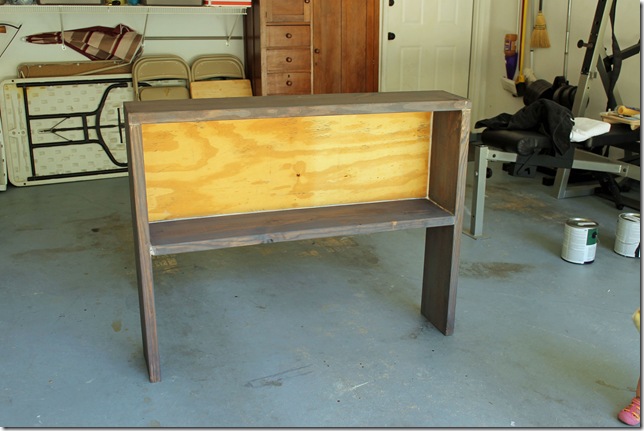
After the first coat, I thought it looked pretty good. 

IMG_4355

The stain dried a lot lighter than it went on.  After it started drying I decided that it did need a darker coat.  I drained the cup to about half of what was in there and added more paint to thicken it up.  Once the whitewash was thicker, then I painted another coat.  I apologize to anyone that is going to try to recreate this, it really was a do-as-you-go project and I didn’t measure anything on the painting end. 

IMG_4356

After the second coat of whitewash it was looking better.  I didn’t care about making the whitewash even because I planned on sanding it down and making it more rustic/warn, so the more uneven the coats of whitewash were the better. 

IMG_4358

Little man had to get in on the action too. 

IMG_4360

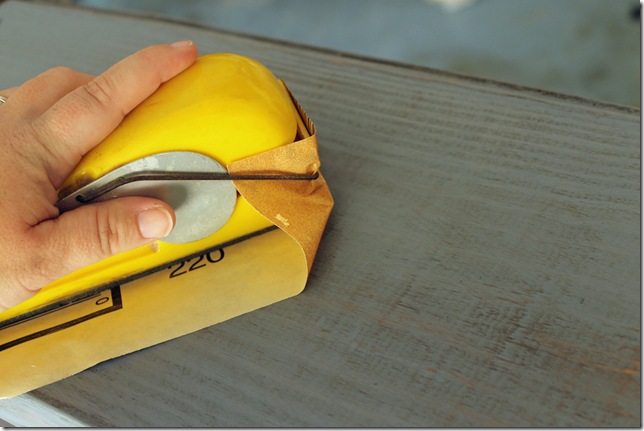
I waited about an hour to make sure the whitewash was completely dry then I started sanding.
IMG_4361

I sanded it with a fine grain sandpaper, all over.  I really focused on the edges because I wanted them really warn.

IMG_4364

After I was done sanding it was time for the final step of painting.

IMG_4367

I used leftover paint from our bathrooms to paint the back.  We originally did not plan on putting a back on the table but the table was not sturdy enough for us and we worried about the babies running around and accidently knocking it over.  After putting the back on it, the table was much more stable.  Because we didn’t plan on the back, we had to use what we had around the house.  We used plywood for the back of the table.  Plywood is not easy/fun to paint or stain, because I knew plywood is not high quality wood I knew it would not be pretty to stain and whitewash so I had to paint it.  I wanted to paint it with good quality/thick paint.  I chose the paint from our bathroom because we bought the most expensive Valspar paint Lowes offered.  The paint worked pretty well, but it still didn’t look that great so I put two coats on.

IMG_4370

Hubby giving it the approval.  It passed!!  He liked it.  Then it was time to take it inside. 

IMG_4374

Ta-da!  I’m proud of it.  This was the first time we have ever built anything from scratch and I think it turned out pretty well.  We won’t talk about how frustrated hubby got with me when he asked for the level and I went for my iphone with the level app.  He nicely informed me he wanted a real level.  But after all the blood, sweat, and tears, ITS DONE and I’m in love with it!


The table plus my flag board plus my new living room color…I’m finally in love with my living room!!!  I still have many little décor projects in the making to decorate my new table but those are for another day!  Til then, hope yall had a great Monday and have a good week!!

Rustic American Flag

We are working to add a little life and personality to our home, on a very tight budget I might add.  Wall art/home décor can be very pricey, so I have set out to find things we like and make them el cheapo for our place.  When we moved in hubby was brown-happy, including our wall art.  So I set out to find inspiration, or Pinspiration, for ideas.  Where else does one go when searching for ideas, Pinterest!  I found this awesome red and white stripes with a blue star.
Stripes with big star
I tried to find the source and original pin but it said it was reported as spam!?  I don’t know weird error message, so if for some reason the original source of this picture happens to stumble (because it would have to be a stumble) upon my blog, I am not trying to take credit of your picture/idea and I tried to find you.  I apologize! Smile

So I immediately fell in love, took a picture, sent to the hubby for approval, received the ok text message back- score! 

We headed to Lowes, to purchase wood for another project and paint for another project, and on our way home swung through Hubby Lobby (like that play on words, he says my trips there always require work from him…and they do!) and we picked up a metal star and blue spray paint.  I planned on using other stuff we had around the house to complete this look.  I knew exactly where this was going to go, however I failed at a before picture.  Sorry!

First thing I did was take leftover wood and beg hubby to cut it into a square.  Before he started cutting, I said WAIT and he about cut his finger off, not really but he jumped.  I had a thought, we took the board inside and held it up in the place I wanted to hang it.  We both decided it would be best oblong.  So we left the piece of wood as is, score less work for hubby!

So the supplies I needed where:
a piece of wood
red and white acrylic paint
blue spray paint
painters tape
sponge brush
metal star

I began by taping off lines on my board.  I didn’t get too fancy I knew I wanted less red stripes and wanted them chunky looking so I used the width of my painters tape to estimate how far apart I wanted the stripes. 
IMAG0077
Once I got the tape down I was ready to start painting.  Like I said I didn’t want but two red stripes so that is the color I started with.  Selecting the “right” red was the hardest part of this project.  I knew that I wanted it to look rustic so “true red” would have been too red, but if I went with a “rust” it would look to orange, so I ended up with “Tuscan red”.  I’m SO happy with my choice.
IMAG0078
I used the sponge brush to paint it on with so I didn’t have brush marks.  I wanted the grain of the wood to show through slightly for the rustic feel but not too much.  I ended up having to do about three coats of red. 
IMAG0079
After I let the red dry completely, I peeled off the tape to see the damage.  There is one thing I HATE and I do mean HATE and that is taking the time to use painters tape, paint gently, wait for it to dry, and peel it off only to show bleeding.  It just burns my hiney!  I have about three different brands of “painters” tape and all of them do this.  So if you have a tape that works for you, puh-lease leave me a comment with your suggestions!  
IMAG0080
To my surprise, this tape did a pretty good job.  Not too much bleeding and none that could be seen once I added the white.  

I forgot to mention above, but I even painted the side of the board for a finished look.
IMAG0082
I took the painters tape and placed it over the red lines,  I was going to try to free hand the white, but I knew I was not that good at painting so I opted out of doing it that way.  Once I got the tape to cover up the red lines completely, even on the sides of the boards, then I started painting the whites. 

For the most part this worked great, there were no white runs into the red.  What I did have to do was touch up some white because, for some odd reason, there was raw wood between the red and white lines.  I just dabbed some white on that raw wood and we were good to go!

I failed to get pictures of the last two steps.  No worries, they were super easy and I’m pretty good at explaining:

White I was waiting for the white to dry, I spray painted my rusted looking metal star blue.

While that was drying, hubby nailed a finishing nail into the board.

After all was dry, I removed the last painters tape, hung the star and ta-da…


There she hangs in her beauty!  I absolutely am in love with it.  Hubby even told me this was his favorite of all my projects to date!  Cha-ching!!  I love that it represent my country but is rustic at the same time.  It’s perfect and was a perfect fit for this space as we work to revamp our living room décor.

Speaking of revamping, this last picture gives you a sneak peak at our painting project…yes I have LOST my mind and am already repainting our living room!  I can’t help it, I was browned out.

P.S.
I apologize for the quality of these pictures, my iphone is packed and I need to download the pictures to free up space and my big cam was dead…so these are pictures taken from hubby’s phone.